Foundations
As with so many aspects of building, you have two main approaches to the foundations: careful calculation or hit and hope. I went for the latter.
The Contenders
For a quick summary of the main types of domestic foundations used in the UK, please see https://www.matrixstructuresuk.com/5-main-types-of-foundations-in-the-uk/. Your architect, structural engineer or builder would typically recommend one based on cost, the soil type, the load of the building, and the local conditions.
The additional options when supporting a shed are Oakwood Garden Rooms’ concrete pad + steel rod method and ground screws. If considering ground screws, LoadBear will give you a very quick quote and I thought they were reasonable at £1,600 for around 17 screws, including installation.
The Winner
The foundations seemed like a good place to save money as the raw materials are relatively cheap. Therefore, I ruled out any professional help. Since there were tree roots crossing the site, which I didn’t want to damage, that left me with the options of:
- Concrete pads.
- DIY ground screws.
- Oakwood Garden Rooms’ steel rod method.
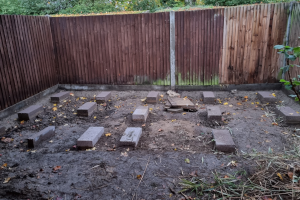
I didn’t want to mix concrete, and didn’t know whether the steel rods would actually work well with SIPs as I think the rod usually extends up into the floor joists. I priced up DIY ground screws, and they came to around £900, depending on size, installation method and supplier. In the end, I went for pads as they have a much larger surface area than an equivalent number of ground screws and are much cheaper. Plus, it’s what Ali Dymock did and I don’t think you can go too far wrong by copying him. Instead of pouring concrete pads, I used 450 x 300 x 100 mm concrete 30 kN blocks. There were two blocks per pad, with two thirds of the first one underground and one completely above ground for a total air gap of around 150 mm.
The Process
Ground Prep
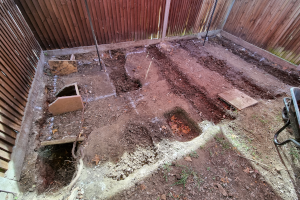
This is the time-consuming bit where I should probably have rented a mini digger. I’d have saved several days’ work, would have enjoyed driving it and I could probably have found one for <£200. Instead, I used a spade, fork and wheelbarrow for the majority. I didn’t only have to level the site but also had to remove an old concrete obstacle and dug down an extra 60 mm to make sure the roofline wouldn’t be too high.
Laying Out
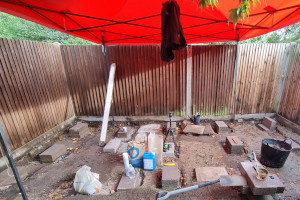
Laying out was done with a string-line, tape measure, laser level and ground marking spray paint. I don’t think I could have done it without any one of these. In particular, it showed how useful having a laser level with side and front beams is.
My main concerns were:
- getting the pad foundations in the right locations, meaning squarely under each corner and under each floor joist.
- getting the base aligned with the back of the house rather than the (more tempting) fence.
Supplies
I bought the foundation supplies from Materials Market:
- A bulk bag of MOT Type 1 hard core.
- Everbuild 201 Mortar Admix.
- 45 100 mm 7.3 N concrete blocks.
- Two 25 kg bags of plastering sand.
- A 1 kg bag of cement.
I had to supplement the bought hardcore with the hardcore I had put to one side when disposing of the old sheds.
Digging
For each pad foundation, I dug down to around 150 mm below the ground level and filled with hardcore so that the resulting hole was around 0 mm deep. Each hole was at least 100 mm wider and longer than the blocks. Sometimes it was easier to dig a trench. I back-filled each hole with around 100 mm of hardcore and compacted it with an offcut of timber.
Block Laying
With the holes prepped, I laid the first course. I used the laser level to get the depth right and a mallet to adjust. I bought a small spirit level to check the blocks my larger one wouldn’t fit down in the hole for the first course. Each block was laid on a bed of mortar, which I made with a four to one mix and some plasticiser.
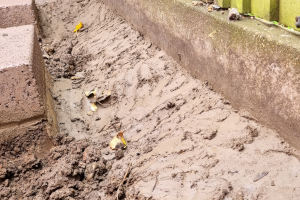
The second course of blocks was laid in the same manner. I used a tape measure and laser level to make sure they were all within a mm or two of each other. I added 45 degree slopes to the outsides of the outside blocks to direct any rainfall away from the foundations and added a 45 degree slope of clay soil to the perimeter of the site to shore up the concrete fence gravel boards.
The block laying was pretty fiddly and I did it over the course of several summer evenings. Working later made it much easier to see the laser level. I had done almost no bricklaying before and found the blocks to be tricky as there didn’t seem to be much tolerance for putting too much or too little mortar on. Having to lift a block repeatedly, to add or remove mortar, did not spark joy.
Note that there are actually six pad foundations at the front of the shed. I had to split one into two parts as there was a large root in the way, which I didn’t want to disturb.
DPC and Weed Membrane
I should have cut out and glued on the DPC rectangles at this point. In reality, I left it until the shell assembly day when it got done in a hurry and I expect several pieces of DPC shifted out of place or fell off as we slid the base around. Likewise, we didn’t fit the weed membrane until the day of assembly when I could have put it down earlier. I didn’t use any chippings or other material to hold the membrane down other than some U-shaped pegs that came with it. I reasoned that I didn’t have that much air circulation space to play with but, if I did it again, I might use some chippings to hold the membrane down.
Thoughts
If you aren’t going to do proper calculations, you need to over-build and I think I did. The shed keeps the foundations dry and dry clay soil seems pretty rock hard to me. With a structure as light (relatively) as a shed, I think you could get away with a lot as long as you aren’t putting a jacuzzi in there.
Tools Used
- Fork and spade
- Wheelbarrow
- Titan SDS drill (yes, the ground is that hard and rocky)
- String-line and steel pegs
- Tape measure
- Marking paint
- Spirit level
- Laser level and tripod
Player of the Match
A close run thing between the laser level & tripod and the gazebo. The gazebo gets it by a hair because, that summer, the weather swung between torrential rain and baking sun.
What I’d do Differently
I’d rent a digger or pay the £1600 for ground screws.


