Electricals
Design
I tried to think through the types of electrical load I would have in the shed and allow that to determine the number and size of circuits:
- I would need power tools, battery chargers, task lighting, etc. These would need sockets to plug in to and these should be on their own 32 A circuit.
- I would need a 6 A lighting circuit. I wanted this to be independent of the sockets so that they would stay on, even if a short or ground fault tripped the sockets.
- I would need a 6 A circuit for external wiring. Currently, this is only used for a security light but external items are the most likely to trip a breaker due to water ingress, so I wanted them separate from the others. I might put an external socket for gardening tools or garden lights on this circuit in the future.
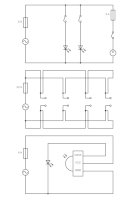
A few things to note about the circuit diagram:
- The fan, marked with an “M” for “Motor”, is on a fused spur from the lighting circuit.
- The two LED ceiling lights can be switched independently.
- To reduce resistance/increase capacity, I decided to put the sockets on a ring final circuit. The sockets are shown as open circuits in the middle circuit of the first image. All the sockets were directly on the ring, but I believe I could have had half of them as spurs if I wished.
- The last circuit shows that the LED is turned on by a passive infra-red sensor but these actually come as a single unit (see Shopping List).
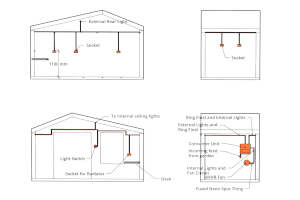
With the physical layout, I tried to limit the number of wires in any stretch of conduit to six (i.e. two ground, two live and two neutral). I may have had to go over this for a short stretch, but six is my comfortable limit for pulling wires through bent conduit.
Installation
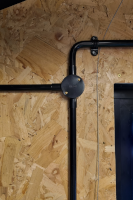
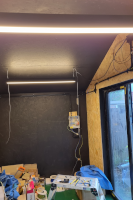
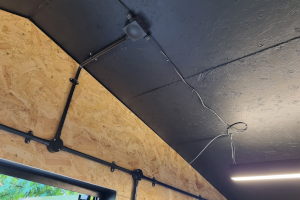
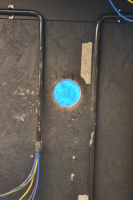
I surface-mounted 20 mm black PVC conduit to carry the wiring, which was 2.5 mm² PVC “singles”. I like the appearance of the conduit and how easy it is to add or remove sockets, lights or entire circuits. After watching GSH Electrical’s very clear YouTube video, it still took some practice with some sacrificial conduit to be able to bend it consistently. If you don’t want to bend it, you can use circular conduit boxes on each corner. The bends give a neater appearance, but they add a lot to the drag when pulling wires through, so I would try not to put more than two bends or a bend and a set in each piece of conduit.
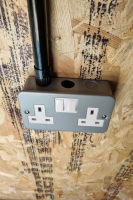
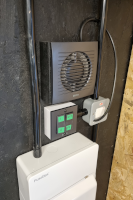
As you can see in the picture, I couldn’t use the middle hole on these Contactum socket boxes as the male adaptor thread hits the back of the switch faceplate.
Shopping List
Without the help of an electrician, I would have found it difficult to know exactly what to buy, so I’ll explain everything I bought below:
- Conduit and fittings:
- 20 mm heavy gauge conduit (model in SketchUp to know how much to order)
- Black enamel saddle spacers (to fix the conduit to the walls) x 40
- Terminal conduit boxes (for whenever a cable needed to go through the wall)
- Conduit tee boxes (to spur off to a socket or light)
- Box lids and screws (for each terminal or tee box)
- Male adaptors (one for each time the conduit enters or leaves a switch, or socket box, the consumer unit or a Wiska 308)
- Wiska 308 junction boxes (to connect the flexible three-core light cables)
- Heavy gauge bending spring (there is a different spring for light gauge conduit)
- 2.5 mm² PVC singles (I bought 100 m each of brown, blue and green/yellow, but I think I could have used a smaller gauge for the ground)
- 13 A two-gang sockets (by Contactum) x 7
- 10 W LED floodlight for the outside
- Fused, switched spur for flex with light (to isolate the MVHR unit, though I’m not sure if it was strictly necessary)
- Two-gang switch (so that each light has its own switch)
- FuseBox T2 6-way surge protection consumer unit (currently using 3 of the ways, one RCBO for each circuit)
- 6 A RCBOs (for internal lighting and external floodlight) and one 32 A RCBO (for the sockets) x 2
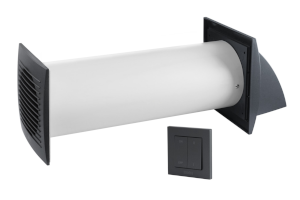
- EER100SA Heat Recovery Fan (basically an extractor fan with a heat exchanger)
- 1 Gang Square Corner PVC Surface Box (for the MVHR switch, see MVHR below)
- Two Vasco AVASLED/B 1200 mm black dimmable suspended LED lights (see Lighting, below)
Note that this doesn’t include the steel wire armoured cable, cable clips, circuit protectors, conduit, etc. that were needed to connect &shed to the house.
Lighting
There’s no such thing as a shed that is too well lit. I have two 1200 mm black Vasco AVASLEDB suspended LED lights, which have a secondary LED strip on the top and can be surface mounted or suspended. I partially bought them because they are dimmable with a 1-10 V DC signal but the cost of the dimmer switches turned out to be prohibitive. I’m glad I didn’t go to the extra expense and wiring effort as I would always have them on full blast anyway.
Where the flexible three-core cables from the lights meet the conduit system, I use a Wiska 308 junction box and glands.
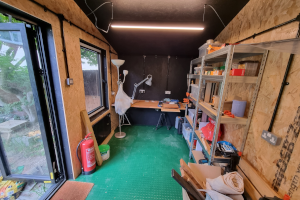
I mounted the lights to either side of the roof apex, running back to front so that the highest point of the shed is unobstructed in case I have something tall in there, or I want to do any exercises that require me to reach over my head.
MVHR
In spite of countless initiatives to improve the energy efficiency of British homes, the availability and affordability of Mechanical Ventilation with Heat Recovery (MVHR) systems, particularly for small buildings, is still poor.
My options seemed to be:
- Get the smallest “proper” MVHR system I could find, such as the £400 Vent Axia HR Single Room Ducted Heat Recovery Unit and add on some ducting, a switch and other accessories.
- Get a well-made Blauberg, Vent Axia or Kair single-room MVHR fan for between £300 and £400.
- Get a cheap single-room MVHR fan for around £150.
The first option seemed like overkill for &shed but would probably be suitable for a room that is going to generate some condensation, say a shower room, or a larger garden room. I’m sure the heat exchange efficiency and the filtration will be better with this option, and it might well be quieter since the large fan will be running at a lower speed.
The second option doesn’t appeal to me at all. I think Blauberg and Kair have got into a niche market early and have been charging a heck of a lot for a fan in a tube with some bluetooth connectivity.
So, option 3 it was.
For whatever reason (I guess you get what you pay for) the switch that came with the Europlast EER100SA didn’t have a back box. This turned out to be a complete pain because neither did it have any obvious way to secure it to a back box. I had to carefully drill some holes and use wood screws, which I filed down the sharp points of, to fix the switch to the back box. Once wired up, the switch didn’t work as advertised, so I had to relabel the power and speed switches. I wired the fan into the lighting circuit since I wanted it to stay on even if the sockets tripped.
Since the SIP walls were 170 mm thick, I had to cut the MVHR duct shorter than the advertised minimum length. It worked OK with the fan protruding an inch or so from the wall into the shed. I hadn’t used battens to mount the cladding, this would have been closer to two inches and I might have had a rethink.
Heating
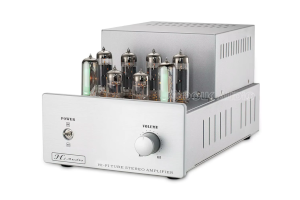
The plan was to heat &shed with a valve amp kit that hadn’t been assembled, so it seemed prudent to get a secondary source of heating. The valve amp in question is a Chinese made push-pull EL84 by Douk Audio, available on Ali Express.
There are lots of electric heaters on the market and most of them are a bit of a scam. Ignoring heat pumps, which can have efficiencies > 100%, all forms of resistive heating will be close to 100% efficient because its really, really easy to turn electricity into heat. Some “infra-red” heating panel manufacturers will try to convince you that “infra-red” heating is somehow distinct from (and superior to) convection heating, but you’ll notice a distinct lack of clear explanation or data to back up the claims.
The shed-suitable options seem to be:
- Forced air heater (i.e. heating element plus fan)
- Conventional electric radiator or storage heater (using a mixture of convection and radiation to transfer heat)
- Under-floor heating
- “Infra-red” radiator (claiming to be more radiative than the above)
- Solid fuel stove
From a value point of view, the more you spend on insulation and air tightness, the less you should need to spend on heating and the longer it will take to recover your costs if you spend extra for a more “efficient” heat source. For this reason, and because I wanted to keep the floor buildup minimal to maximise headroom, I ruled out under-floor heating, which is one of the more expensive options to install.
A solid fuel stove would have been a nice addition, though it would need to have a dedicated cold air intake rather than drawing air from the (air tight) room. Ultimately, though, they’re an expensive luxury in metropolitan areas where you’re unlikely to have a cheap source of firewood. They also take up more floor space than wall- or ceiling-mounted radiators.
I presume that a cheap fan-assisted heater would do a good job of distributing the warm air around the room. I can see some advantages over a panel radiator, which has to wait for air currents to establish. If you expect to use a space in short bursts, it makes sense to have a high-power, fan-assisted heater and to only put the heater on while you’re in there.
I’m sure we’ve all basked in the warm glow of near-infrared heaters in a pub beer garden. I can’t find anything definitive online, but it seems that their high filament temperature (over 1,000° C) may present a fire hazard in a SIP-constructed building.
Medium/far-infrared heaters seem to be relatively new to the domestic electric heating scene. There are bold, unsubstantiated claims online about their benefits, which I am dubious about. However, I can imagine that the subjective experience of being warmed by radiation could be more pleasant than being warmed by convection, and they come in lightweight slim panels that could easily be ceiling mounted. I wouldn’t rule them out but don’t see any clear benefits to justify the cost over standard resistive heaters. Let me know if you’ve had any experience, bad or good, with them.
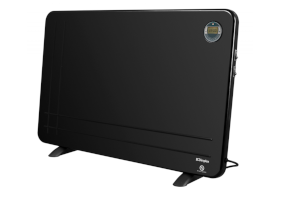
Ultimately, I grabbed a cheap, slim Dimplex DXLWP800Tie7B electric heater (available here) for a couple of reasons:
- It has a programmable timer, so it can pre-heat the shed on cold mornings. When I get down to work, I can fire up the valve amp and turn off the radiator.
- It is slim and comes with wall mounting brackets, so it effectively takes up very little (arguably no) floor space.
- It has two switchable elements, so you can choose between 300 W,500 W or 800 W output.
- There was an offer on, making it only about £70.
Thoughts
I’m completely convinced that surface mounted plastic conduit was the right choice for the wiring. I’ve already had to move two sockets to work around shelves and other wall mounted storage, which would have been a nightmare with wiring chased into plaster.
